
Fix Wobbly Loose Faucet Handle: A Step-by-Step Guide
A wobbly, loose faucet handle isn’t just annoying; it can also lead to drips, leaks, and eventually, more significant plumbing problems. Fortunately, fixing a wobbly loose faucet handle is often a simple DIY project that can save you money and prevent water wastage. This comprehensive guide will walk you through the process, providing clear instructions and helpful tips to get your faucet handle back in tip-top shape. We’ll cover common causes, necessary tools, and step-by-step instructions to resolve your wobbly loose faucet handle issue efficiently.
Understanding the Problem: Why is Your Faucet Handle Wobbly?
Before diving into the repair, it’s essential to understand why your faucet handle is loose. Several factors can contribute to this issue:
- Loose Screws: The most common culprit is a loose screw that secures the handle to the valve stem. Over time, vibrations and regular use can cause these screws to loosen.
- Worn-Out O-Rings or Washers: O-rings and washers provide a tight seal between the handle and the faucet body. If these components wear out, the handle can become loose and wobbly.
- Corrosion: Corrosion can build up around the handle and valve stem, preventing a secure connection.
- Damaged Valve Stem: In rare cases, the valve stem itself might be damaged, which requires a more complex repair or replacement.
Gathering Your Tools and Materials
Before you start, gather the necessary tools and materials. Having everything on hand will make the repair process smoother and more efficient:
- Screwdrivers: You’ll need a set of screwdrivers, including both Phillips-head and flat-head screwdrivers, to handle various screw types.
- Adjustable Wrench: An adjustable wrench is useful for tightening nuts and bolts.
- Pliers: Pliers can help you grip and manipulate small parts.
- Allen Wrench Set: Some faucet handles are secured with Allen screws.
- Penetrating Oil: If you encounter corrosion, penetrating oil can help loosen stubborn parts.
- Replacement O-Rings and Washers: Having a selection of replacement O-rings and washers on hand can save you a trip to the hardware store.
- Clean Cloths or Rags: These will be useful for cleaning and wiping up any spills.
- White Vinegar: For removing mineral deposits.
Step-by-Step Guide to Fixing a Wobbly Loose Faucet Handle
Follow these steps to fix your wobbly loose faucet handle:
Step 1: Turn Off the Water Supply
Before you begin any plumbing repair, it’s crucial to turn off the water supply to the faucet. Locate the shut-off valves under the sink. There should be separate valves for hot and cold water. Turn both valves clockwise until they are completely closed. If you can’t find individual shut-off valves, you may need to turn off the main water supply to your house. Test the faucet to ensure the water is completely shut off before proceeding.
Step 2: Identify the Faucet Type and Handle Attachment
Different faucet types have different handle attachment methods. Common types include:
- Single-Handle Faucets: These faucets have one handle that controls both hot and cold water. The handle is usually attached with a screw hidden under a decorative cap or button.
- Two-Handle Faucets: These faucets have separate handles for hot and cold water. The handles may be attached with screws, nuts, or threaded connections.
- Ball-Type Faucets: These faucets use a ball valve mechanism and often have a single handle that controls both water flow and temperature.
Carefully examine your faucet to determine how the handle is attached. This will help you choose the right tools and techniques for removing the handle.
Step 3: Remove the Faucet Handle
The removal process varies depending on the faucet type. Here are some common methods:
For Handles with Screws Under a Cap:
- Locate the decorative cap or button on the handle.
- Use a small flat-head screwdriver or a utility knife to gently pry off the cap.
- Underneath the cap, you’ll find a screw. Use the appropriate screwdriver (Phillips-head or flat-head) to loosen and remove the screw.
- Once the screw is removed, you should be able to pull the handle straight off the valve stem.
For Handles with Setscrews:
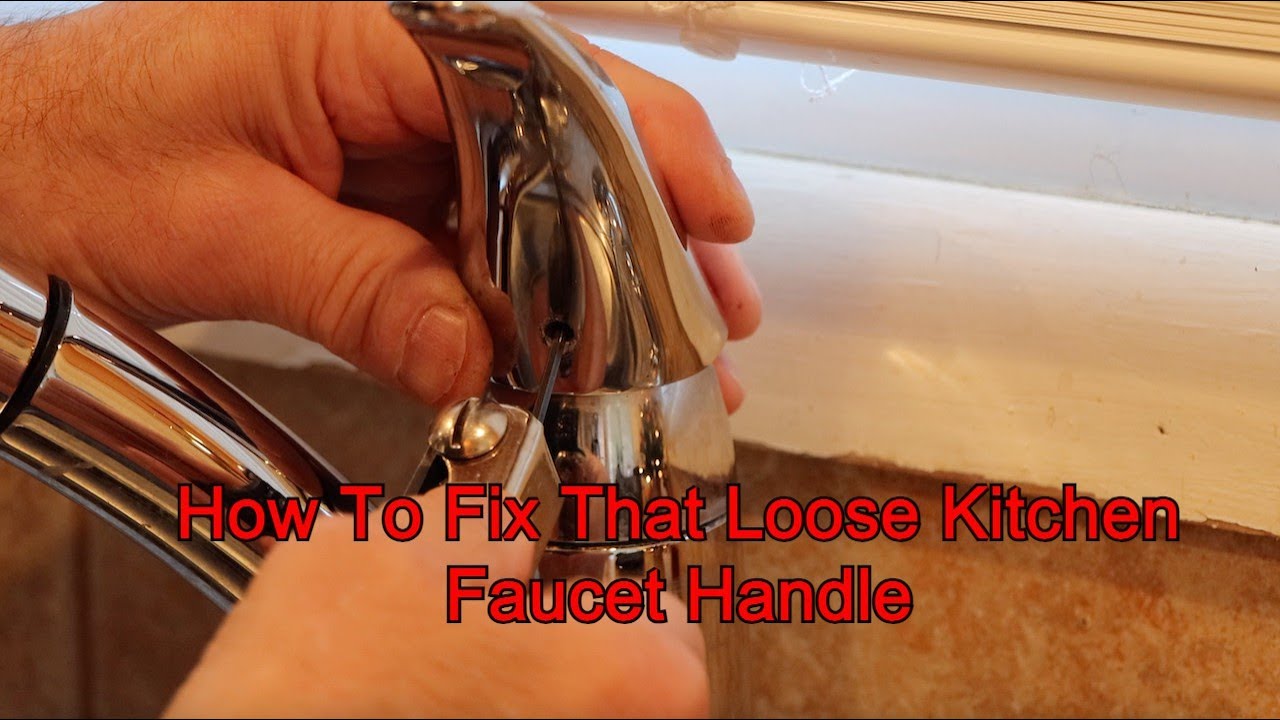
- Look for a small hole on the side of the handle.
- Insert the correct size Allen wrench into the hole.
- Loosen the setscrew by turning the Allen wrench counterclockwise. Do not remove the setscrew completely.
- Once the setscrew is loose, you should be able to pull the handle off the valve stem.
For Handles with Threaded Connections:
- Grip the base of the handle with an adjustable wrench.
- Turn the handle counterclockwise to unscrew it from the faucet body.
- Be careful not to damage the finish of the faucet when using the wrench.
Step 4: Inspect the Components
Once you’ve removed the handle, inspect the following components:
- Screws: Check the screws for damage or corrosion. If the screws are stripped or corroded, replace them with new ones.
- O-Rings and Washers: Inspect the O-rings and washers for wear, cracks, or deterioration. If they are damaged, replace them with new ones of the same size and type.
- Valve Stem: Examine the valve stem for damage or corrosion. If the valve stem is damaged, you may need to replace the entire faucet.
- Handle Interior: Look for mineral buildup or corrosion inside the handle. Clean with white vinegar and a small brush if needed.
Step 5: Tighten or Replace Loose Components
Based on your inspection, take the following steps:
- Tighten Loose Screws: If the screws were simply loose, tighten them securely. Be careful not to overtighten them, as this can strip the threads.
- Replace Worn-Out O-Rings and Washers: Remove the old O-rings and washers and replace them with new ones. Apply a small amount of plumber’s grease to the new O-rings and washers to ensure a smooth seal.
- Clean Corrosion: If you find corrosion, use a wire brush or a specialized corrosion remover to clean the affected areas. Apply penetrating oil to stubborn corrosion.
Step 6: Reassemble the Faucet Handle
Once you’ve tightened or replaced the necessary components, reassemble the faucet handle in the reverse order of disassembly. Ensure that all parts are properly aligned and securely tightened.
Step 7: Test the Faucet
After reassembling the faucet, turn the water supply back on slowly. Check for leaks around the handle and faucet body. Turn the handle to test the water flow and temperature. If the handle is still loose or wobbly, double-check your work and make sure all components are properly tightened or replaced.
Troubleshooting Common Issues
Even after following these steps, you may encounter some common issues:
- Handle Still Loose: If the handle is still loose after tightening the screws, the valve stem may be damaged. Consider replacing the entire faucet.
- Dripping Faucet: If the faucet is dripping after the repair, the O-rings or washers may not be properly seated. Disassemble the faucet and re-seat the O-rings and washers, ensuring they are properly lubricated.
- Stiff Handle: If the handle is stiff to turn, apply a small amount of plumber’s grease to the valve stem and O-rings. This will help lubricate the moving parts and make the handle easier to turn.
Preventative Maintenance
To prevent your wobbly loose faucet handle from recurring, consider these preventative measures:
- Regularly Tighten Screws: Check the screws on your faucet handles periodically and tighten them as needed.
- Replace Worn-Out O-Rings and Washers: Replace O-rings and washers at the first sign of wear or leakage.
- Clean Faucets Regularly: Clean your faucets regularly to remove mineral buildup and corrosion.
When to Call a Professional
While fixing a wobbly loose faucet handle is often a simple DIY project, there are times when it’s best to call a professional plumber. Consider calling a plumber if:
- You’re uncomfortable working with plumbing.
- You can’t identify the cause of the problem.
- The valve stem is damaged.
- You’ve tried to fix the problem yourself, but it persists.
By following this comprehensive guide, you can effectively fix a wobbly loose faucet handle and prevent future problems. Remember to take your time, follow the instructions carefully, and don’t hesitate to call a professional if you’re unsure about any step. Maintaining your faucets will not only prevent annoying wobbles but also save water and money in the long run. A wobbly loose faucet handle is a common issue, but with the right tools and knowledge, you can easily tackle this repair yourself. Addressing a wobbly loose faucet handle promptly prevents further damage. Don’t ignore a wobbly loose faucet handle; fix it today!
[See also: How to Replace a Kitchen Faucet]
[See also: Common Plumbing Problems and Solutions]
