
How to Build a Patio: A Comprehensive Guide
Building a patio can transform your outdoor space into a welcoming area for relaxation, entertainment, and enjoying the fresh air. Whether you’re envisioning a cozy spot for morning coffee or a spacious area for summer barbecues, understanding the process of how to build a patio is crucial. This comprehensive guide will walk you through each step, from planning and preparation to construction and finishing touches, ensuring a successful and satisfying DIY project. This article will explore different materials, tools, and techniques necessary to create a durable and aesthetically pleasing patio.
Planning Your Patio Project
Before you even think about picking up a shovel, careful planning is essential. This stage involves assessing your space, determining the patio’s size and shape, choosing the right materials, and obtaining any necessary permits.
Assessing Your Space
Begin by evaluating the area where you intend to build your patio. Consider the following:
- Size and Shape: Measure the area to determine the maximum dimensions of your patio. Think about the shape – rectangular, square, circular, or freeform – and how it will complement your landscape.
- Slope and Drainage: Check for any existing slopes or drainage issues. A slight slope away from your house is ideal for preventing water from pooling. If necessary, plan for proper drainage solutions.
- Sunlight and Shade: Observe how sunlight affects the area throughout the day. Consider the need for shade structures, such as pergolas or umbrellas.
- Utilities: Identify any underground utilities, such as gas lines or electrical cables. Contact your local utility company to mark these before you dig.
Choosing Your Materials
The material you choose will significantly impact the look, durability, and cost of your patio. Popular options include:
- Pavers: Pavers are available in various shapes, sizes, colors, and materials, such as concrete, brick, and natural stone. They are durable, easy to install, and offer a wide range of design possibilities.
- Concrete: Concrete is a versatile and cost-effective option. It can be poured in place or precast as slabs. Stamped or stained concrete can mimic the look of more expensive materials.
- Natural Stone: Natural stone, such as flagstone, slate, or limestone, offers a unique and rustic look. It is durable and adds a touch of elegance to any outdoor space.
- Gravel: Gravel is an affordable and low-maintenance option. It is easy to install and provides good drainage. However, it may not be as comfortable to walk on as other materials.
- Wood: Wood patios offer a warm and natural feel. Popular choices include cedar, redwood, and pressure-treated lumber. Wood requires regular maintenance to prevent rot and decay.
Consider the pros and cons of each material based on your budget, aesthetic preferences, and maintenance requirements when deciding how to build a patio.
Obtaining Permits
Depending on your location and the size of your patio, you may need to obtain a building permit. Check with your local building department to determine the requirements in your area. Obtaining the necessary permits ensures that your patio complies with local building codes and regulations.
Preparing the Site
Proper site preparation is crucial for the stability and longevity of your patio. This involves clearing the area, excavating the soil, and creating a solid base.
Clearing the Area
Remove any existing vegetation, rocks, or debris from the area where you will build your patio. Use a shovel or spade to clear the topsoil and expose the underlying soil.
Excavating the Soil
Excavate the soil to a depth of at least 6-8 inches. This will provide enough space for a base of gravel and a layer of sand. Use a level to ensure that the excavation is even and slopes slightly away from your house for drainage.
Creating a Base
A solid base is essential for preventing your patio from settling or shifting over time. Follow these steps to create a base:
- Gravel Layer: Spread a layer of crushed gravel, about 4-6 inches thick, over the excavated area. Use a rake to distribute the gravel evenly and a plate compactor to compact it firmly.
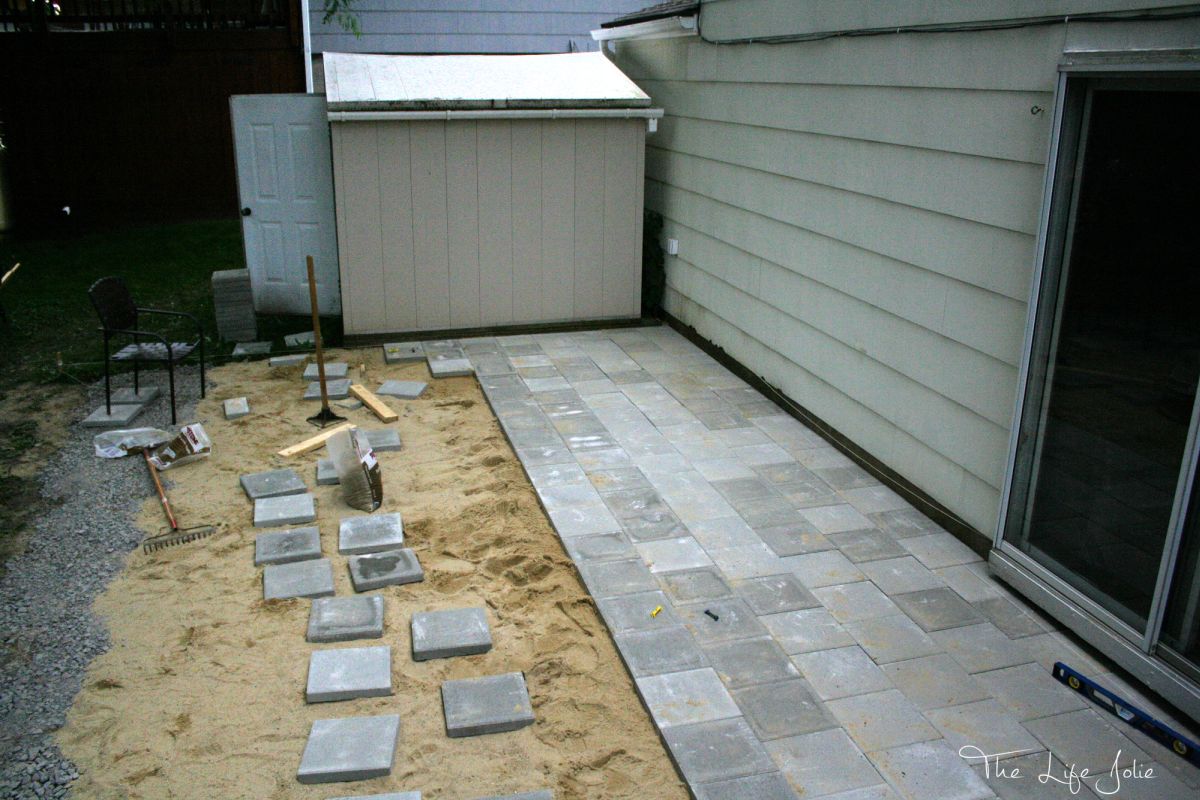
- Sand Layer: Spread a layer of coarse sand, about 1-2 inches thick, over the gravel. Use a rake to level the sand and a long, straight board to screed the surface. This will create a smooth and even surface for laying your pavers or other materials.
Building Your Patio
With the site prepared, you can now begin constructing your patio. The specific steps will vary depending on the material you have chosen.
Laying Pavers
If you are using pavers, follow these steps:
- Plan Your Layout: Before laying the pavers, plan your layout to ensure a visually appealing design. Consider using different colors, sizes, or patterns to create interest.
- Lay the Pavers: Starting from one corner, lay the pavers one at a time, pressing them firmly into the sand. Use a rubber mallet to tap them into place and ensure they are level.
- Cut Pavers as Needed: Use a paver cutter or wet saw to cut pavers to fit around edges or obstacles.
- Fill the Joints: Once all the pavers are laid, fill the joints with polymeric sand. This will help to stabilize the pavers and prevent weeds from growing.
Pouring Concrete
If you are pouring concrete, follow these steps:
- Build Forms: Build wooden forms to contain the concrete. Ensure that the forms are level and securely anchored.
- Mix and Pour Concrete: Mix the concrete according to the manufacturer’s instructions. Pour the concrete into the forms, spreading it evenly with a shovel or rake.
- Screed and Float: Use a screed board to level the concrete and remove any excess. Then, use a float to smooth the surface and remove any imperfections.
- Finish the Surface: Depending on the desired look, you can brush, stamp, or stain the concrete.
- Cure the Concrete: Keep the concrete moist for several days to allow it to cure properly. This will help to prevent cracking and ensure its strength and durability.
Installing Natural Stone
If you are using natural stone, follow these steps:
- Dry-Fit the Stones: Before setting the stones in place, dry-fit them to ensure a good fit and a visually appealing design.
- Set the Stones: Mix mortar according to the manufacturer’s instructions. Apply a layer of mortar to the base and set the stones in place, pressing them firmly into the mortar.
- Fill the Joints: Fill the joints between the stones with mortar. Use a trowel to smooth the mortar and remove any excess.
Finishing Touches
Once your patio is built, add the finishing touches to create a comfortable and inviting outdoor space.
Sealing the Patio
Sealing your patio will help to protect it from the elements and prevent staining. Choose a sealer that is appropriate for your material and apply it according to the manufacturer’s instructions. How to build a patio that lasts means protecting your investment.
Adding Furniture and Accessories
Add outdoor furniture, such as chairs, tables, and sofas, to create a comfortable seating area. Consider adding accessories, such as planters, lighting, and rugs, to personalize your space and enhance its appeal. A well-furnished patio is a welcome addition to any home.
Landscaping Around the Patio
Landscaping around your patio can help to blend it seamlessly into your outdoor space. Plant flowers, shrubs, and trees to create a lush and inviting environment. Consider adding a border of stones or mulch to define the patio area.
Maintaining Your Patio
Regular maintenance will help to keep your patio looking its best for years to come.
Cleaning the Patio
Clean your patio regularly to remove dirt, debris, and stains. Use a broom or leaf blower to sweep away loose debris. For more stubborn stains, use a pressure washer or a mild detergent and a scrub brush. This should be part of your routine when thinking about how to build a patio that lasts.
Repairing Cracks and Damage
Repair any cracks or damage as soon as possible to prevent them from worsening. Use a concrete patching compound or mortar to fill cracks and repair damaged areas. [See also: Repairing Concrete Cracks]
Preventing Weeds
Prevent weeds from growing in the joints of your patio by applying a weed killer or pulling them out by hand. Consider using polymeric sand in the joints to inhibit weed growth. Preventing weeds is crucial for how to build a patio that looks great all year round.
Conclusion
Building a patio is a rewarding DIY project that can significantly enhance your outdoor living space. By following these steps and taking the time to plan and prepare properly, you can create a beautiful and functional patio that you will enjoy for years to come. Remember to consider your budget, aesthetic preferences, and maintenance requirements when choosing your materials and designing your patio. With careful planning and execution, you can transform your backyard into a relaxing and inviting oasis. Understanding how to build a patio can also increase your home’s value and curb appeal. So, grab your tools, gather your materials, and get ready to build the patio of your dreams! This guide on how to build a patio should provide a solid foundation for any homeowner looking to improve their outdoor space. This knowledge of how to build a patio will be invaluable for years to come. Many homeowners find the process of how to build a patio to be very rewarding. This article on how to build a patio has provided you with the necessary information. The process of how to build a patio requires patience and attention to detail. A successful patio significantly enhances your outdoor living space. Learning how to build a patio is a valuable skill for any homeowner. Proper planning is essential for how to build a patio successfully. Consider all factors before you start how to build a patio. Following these steps ensures how to build a patio correctly.
